Feeds:
Posts
Comments

Posts Tagged ‘Recipes’

Our life can be marked by our losses, which often can be more defining than the days that take our breath away. A loss in life is like running smack into a brick wall, after which you shake off the tweeting birds floating around your head and look around at what’s landed in your path. There is no more going forward as you have been; it’s time to look to either side and determine which is the next best step, choosing your new direction, heading off into the unknown. But sometimes those brick walls of life stop us cold. We had no idea it was coming and it’s frozen us in time, unable to shift our direction and find the new normal. We sit in front of it and stare, uncomprehending this change that we don’t want, and didn’t ask for.

I’ve had times like that. Bad times that have stopped me senseless. I lost my sister in 1991, my Mom in 1994. Both times it was so numbing that I simply sat down, right where I was, and hardly budged. I got stuck a lot in those days, and held big-time pity parties for myself complete with isolation, junk food binges, too much alcohol, or worse, something stronger. I lost a lot of time that I’ll never get back.


This loss was much different, as I had seen it coming for some time. But it didn’t hurt any less. Even with Mike and Griffin right there with me in the Vet’s office, as I held Harmon and felt him slip into an eternal sleep, it was the loneliest feeling I think I have ever known. The past 17 years flashed through my head; every little thing about him that endeared him to me, from the first glimpse of his face to his final day. He was such a part of me that I can’t even imagine how long it will take to stop looking around the house for him. Seventeen years is a very long time. Griffin has never known his life without this big orange cat. I can’t remember much about mine before he came along.

But we move on. We have no choice. And in the days following our loss, I was overcome with urges to eat foods I hadn’t touched in years. The need to cover the pain became very real, and yet none of my old coping mechanisms were still in place and I had to just let the pain seep out of me. It gripped me so hard that it left me physically gasping for air. I had no appetite, but ate mechanically. Nothing had any taste. I wept often, and uncontrollably. I craved fried foods, greasy burgers, heavy pizza, drinks with funny names, being prone under a pile of blankets and more isolation than is humanly wise. I was staring at yet another brick wall and the only thing I knew how to do with pain like this was collapse and disappear from life again.

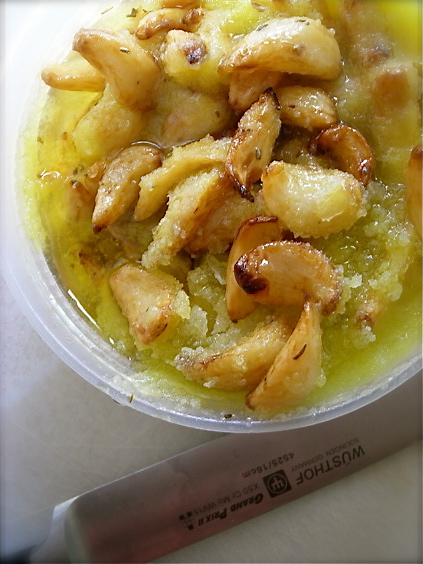
This is now, however, the kinder and gentler Kate, and after the first acute and tenderly painful days, I realized that I did want food, and was pleased that I wanted good food. And the first dish that I took out and set before my grief was my most favorite Lentils and Farro with Caramelized Leeks. The attention to slowly caramelizing the leeks seemed to almost take my mind off the fact that there was no eager golden-hued face at my feet, weaving in and out of my legs as I stood at the stove. Then copious amounts of this white bean and roasted garlic spread not only had me set for life against vampires, but provided heady aromatic and tasty relief (that photo above should give you some clue as to how critical roasted garlic is in my kitchen). There were more roasted vegetables, despite the warm end to March in Minnesota, a succulent grilled pork tenderloin that I buried under a thick mustard glaze, salads crunchy enough to fill the echo within my heart.


And I baked, because what could soothe one more than homemade scones? Lacking fresh fruit for a Sunday morning treat before a necessary and pleasantly grueling 3.5 mile hike, I gently blended thick fruit preserves with the liquid in my favorite scone recipe, and came up with a delightfully light and flavorful round, studded with chopped pecans and warmly comforting to my tummy. Another batch of Orange-Cardamom Scones sent me skyrocketing into sheer happiness, lush with the crisp citrus scent. The secret to these, I am 100% certain, is the citrus-infused turbinado sugar that filled the interior and decked out the tops. With the crunchy sugar and fresh zest, really, can it go wrong?

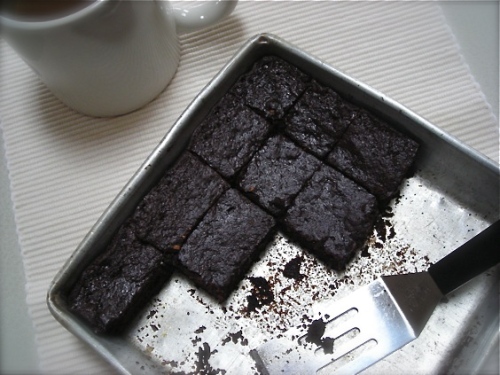
And Brownies. Let’s just say that in everyone’s coping arsenal should be a good solid recipe for a Brownie that will calm even the worst of one’s inner storms. Fudgey or cakey, I’m OK with either because where good chocolate therapy is concerned, I’m always a willing participant.

There was also Spring Break with my Teen that included him getting contacts, and or course, the golden sunshine that tickled and warmed our faces as March bid us farewell. I busied myself cleaning up last year’s detritus in the garden, and marveled that I was sweating on the last day of a typically snowy and cold month. I took a very long bike ride. And I cooked more soothing foods. I’m exploring some terrific options for the weeks ahead, in April, the month where Spring explodes over our part of the Earth. I don’t want to miss out on that, or anything else coming my way these days. There’s no more hiding. Not for this girl.

And Easter Sunday I feel, is an appropriate time for a new beginning, wouldn’t you agree??

Orange Cardamom Scones
adapted heavily from Tyler Florence’s Real Kitchen

2-1/2 c. AP flour
1 T. baking powder
1/2 t. sea salt
2 T. sugar
1 T. orange zest
1/2 t. ground cardamon
5 T. cold unsalted butter, cut into chunks
1/2 c. fresh squeezed orange juice
1/2 c. buttermilk

Preheat oven to 400°. Line a baking tray with parchment.

Combine flour, baking powder, sugar, cardamom and salt. Blend together juice, zest and buttermilk, add to dry ingredients and mix gently with a fork until all flour is incorporated. Careful not to overmix.

Gently scoop individual portions onto cookie sheet. You should get about 8 scones. Bake until slightly browned on top, about 15-18 minutes.

For the Citrus Sugar that I sprinkled on top- Zest one orange and mix the zest with half a cup of turbinado sugar. Place in blender and mix until fully combined. Scrape into container and keep refrigerated. Use regular sugar if you have no turbinado. Sprinkle over tops of scones before baking.
Read Full Post »

I’ve noticed lately that my days seem to be having their own soundtracks. We’ve become a kind of soundtrack world, what with the abundant use of iTunes, the earbud generation and the incessant need to insert any type of sound into the hours. These are the playlists of our lives, what we exercise to, the music in the background while we work, what blasts from our computers as we clean, or cook or just manage the day.

What I’ve been noticing is that each day seems to have it’s unique sound, a type of music that fits to the mood, weather and sense of self that we connect with through our waking hours. While most of us have our favorite music, I wonder how often we switch out the tunes in an attempt to match the feeling of a particular Friday, or a lazy Sunday afternoon or a bright shiny Wednesday morning. Rainy days have their own soundtrack, and sunshine makes music like nothing else. If you’re not sure what I’m talking about, just sit down with an old Warner Bros. cartoon medley, and see what I mean. The Disney animators of old knew exactly how to use music to create a wordless story, to set mood, to create action. Remember the original movie version of Fantasia? It was all about matching music to mood. Vivaldi’s Four Seasons, with it’s gentle Springtime lilt and angry Summer thunderstorm movements are a perfect example. I can’t ever listen to composer Paul Dukas’ famous orchestral work ‘The Sorceror’s Apprentice’ without seeing Mickey Mouse, flashing lights and thousands of brooms. Music sets the tone and starts the imagination, it inspires and ignites us.

And food fits into the sense of every day, much the same as music. We all know those lustrous summer days that beg for a juicy grilled burger and corn that’s fresh from the field, the springtime air that makes you dream of salads, fresh peas and asparagus. Winter speaks like soup, or a hearty stew simmering in a pot and then there’s those days that nothing else will do besides a long slow fire and the smoke of a perfect BBQ. Rain and baking, as I recently discovered, sometimes are the best of friends.

I love having music on when I’m elbow deep in the creative process in my kitchen. With iTunes radio, a huge selection is at my fingertips and with a few clicks I can have the perfect background to what I’m doing. I recently was faced with a rainy day that felt like it would perfectly match with soft cafe jazz, a warm oven and a pan of muffins to make it complete. Sitting at the top of my To Make pile on the counter, the place where inspiration lives with just a few shufflings of papers, was a recipe for Fig Muffins with Lemon Honey Cream cheese filling, and oh how that magically blended itself into the saxophone, the steady patter of spring rain outside the door and the gentle rhythm of mid-week. With a loaf of 10-grain bread from my dog-eared copy of ‘Healthy Bread in 5 Minutes’ and a steaming cup of tea, it was about as right and perfect as it could be to give chase to the gray sky.


Of course, I am a bit head over heels for figs, so it likely didn’t hurt that one of my most favorite fruits was the superstar in this moist and tasty breakfast treat. But when you blend up a lovely fragrant batch of sweet honey and lemon flavored cream cheese and bake up these muffins with it’s delightful hidden center, the result alone may have been enough to push the clouds aside for a ray of sun to enter the house.

Lemon is another true love I’ve found with baking. There’s something about the zesting and the juicing and the way the yellow oval resembles a bright July day that always makes me eager to place a few in my basket at the market. For me, the lemon scented cream cheese alone may be the path to a better day, with or without jazzy backdrop, whether it’s raining or not and I was so glad that I made the whole container into this fragrant mix. I will find ways to consume the leftovers. Like spreading it copiously all over these muffins, because I’ve discovered that with some food items, there simply can’t be enough of a good thing.

What kind of soundtrack defines your days? Do you change up your music to suit your mood??


Fig Muffins with Honey Lemon Cream Cheese filling

adapted from Eating Well magazine, February 2010

Preheat the oven to 400° and line two 6-count muffin pans with liners. You can use cooking spray too, if you like.

1  4-oz container cream cheese, softened
2 T. honey
1 T. fresh lemon zest
2-3 T. fresh squeezed lemon juice
1/2 t. fresh ground nutmeg

In a small bowl, combine all ingredients and blend until smooth. Add more zest or juice if desired. I love a good tart flavor.

For the muffins:

2 c. whole wheat flour
1-1/2 t. baking powder
1/2 t. baking soda
1/4 t. sea salt
1 T. ground flaxseed
2 large eggs, lightly beaten
1/2 c. turbinado sugar (you can sub in brown sugar if you don’t have turbinado)
1 c. buttermilk (I used vanilla soymilk)
1/4 c. extra virgin olive oil
1-1/2 c. chopped dried figs

In a medium bowl, whisk together the flour, baking powder and soda, salt and ground flaxseed. In a separate bowl, combine the eggs, sugar, buttermilk and oil and whisk until blended and uniform. If you’re using turbinado, don’t worry if the sugar doesn’t dissolve fully, just whisk until blended. Mix the wet ingredients in with the dry and stir until just incorporated, then add the figs and gently fold together.

Spoon batter into muffin cups to half full. Add about a tablespoon of the cream cheese mixture to the center of each muffin, then cover with more batter. You shouldn’t see the filling, but don’t worry if you do. I spooned a smaller amount of cream cheese on to the tops of each muffin, but you don’t need to do that. Sprinkle the tops of the muffins with more turbinado sugar, or another sanding sugar if desired, then bake them for 13-15 minutes, or until they spring back when pressed.

Allow the muffins to cool in the pan for 10 minutes, then take them out and allow to cool fully on cooling rack.

Read Full Post »

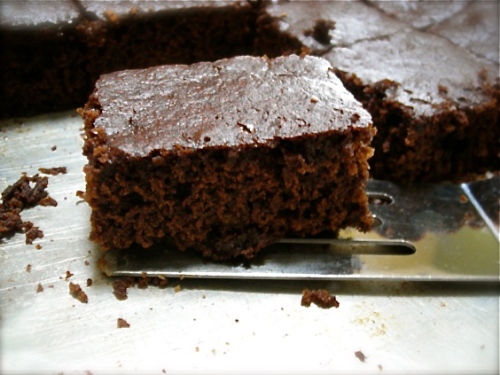
I can safely say that gingerbread, or anything molasses-flavored, is going to go over well in my house. Some people have their chocolate, their Proustian moment that renders them poetic. Apparently ours is gingerbread. And it turns us into stealthy nibblers.

I made a small pan of Martha Stewarts’s Chocolate Gingerbread, primarily as an olfactory impetus in ridding the house of the scent of bacon that I had cooked that morning. I don’t think the pan had even fully cooled before I slipped a knife through it and created a set of imperfect squares for us to sample. It was amazing; rich and moist with the tiniest hint of chocolate among the deep taste of molasses. Griffin and I nodded in agreement over this newfound treat. I pulled plastic wrap over the top and set it on the counter.

And then, a day later, there were considerable gaps in the pan. The next day, even more was gone. Something was amiss, because I’d only had one piece.

I can’t say I fault anyone for freely indulging in this treat. What I love about gingerbread is the lack of cloying sweetness that comes with most desserts. Gingerbread has enough going for it to give it dessert-like status, but it’s also like a teabread, and can be treated like a snack, or even a bit of your breakfast too. It partners equally with a scoop of good vanilla ice cream, a mound of yogurt or even topped with fresh whipped cream.

Or even just eaten out of hand, with a napkin to catch the crumbs.

This recipe, from Everyday Food, yields a moist and superbly tender cake, owing to the use of sour cream in the base. It’s a simple quick bread style recipe that takes minimal effort, but can taste fancy enough for a party, that is, if you can keep it around long enough.

Martha Stewart’s Chocolate Gingerbread Cake
from Everyday Food

  • 4 tablespoons (1/2 stick) unsalted butter, melted, plus more for pan
  • 1/4 cup unsweetened cocoa powder, plus more for pan
  • 3/4 cup all-purpose flour (spooned and leveled)
  • 1 teaspoon ground ginger
  • 1 teaspoon pumpkin-pie spice
  • 1/2 teaspoon baking soda
  • 1/2 cup packed dark-brown sugar
  • 1/4 cup unsulfured molasses
  • 1 large egg
  • 1/4 cup sour cream
  • 1/2 cup semisweet chocolate chips
  • confectioners’ sugar, for dusting (optional)
  1. Preheat oven to 350 degrees. Butter an 8-inch square baking pan. Line bottom with a strip of parchment paper, leaving an overhang on two sides; butter paper. Dust paper and sides of pan with cocoa; set aside. In a medium bowl, whisk together cocoa, flour, ginger, pumpkin-pie spice, and baking soda; set aside.
  2. In a large bowl, whisk together butter, brown sugar, molasses, egg, and sour cream until smooth. Add flour mixture; stir just until moistened (do not overmix). Stir in chocolate chips. Transfer batter to prepared pan; smooth top.
  3. Bake until a toothpick inserted in center comes out clean, 30 to 35 minutes. Transfer to a wire rack; let cool completely. Using paper overhang, lift gingerbread from pan. Transfer to a cutting board, and cut into 16 squares. Before serving, dust bars with confectioners sugar, if desired. (To store, keep in an airtight container at room temperature, up to 3 days.)

KATE’S NOTES:
I skipped the parchment step, instead just using cooking spray on my 8×8 pan. I did not add the chocolate chips, and probably would keep them out of future uses of this recipe. I just don’t think they’re necessary. The molasses taste was rich, the chocolate not so noticeable. I think that the addition of some extra cocoa would make it more balanced- and in future use I may reduce the molasses to 3 T. and increase the cocoa to 1/3 c. to see if it makes a difference. I also thought about the addition of 1 oz. melted bittersweet chocolate to increase that aspect a bit, and may try that. I don’t keep pumpkin pie spice on hand. I used a teaspoon of cinnamon, and 1/4 teaspoon each of nutmeg and allspice.

If you’re interested in other gingerbread recipes, you can find more gingerbread love with just a click.

Read Full Post »

I hope that I never get to a point in my life where I think I’ve seen it all. Especially when it comes to pancakes.

If I had to pick a favorite breakfast option, pancakes might be fighting for top billing. While I do really enjoy pan roasted potatoes, especially with onion and pepper and topped with a soft egg, there is something so versatile and endlessly appealing about the simple pancake. With your standard batter, you can create an enormous palette of tastes and flavors- apple and spice, banana and pecan, chocolate-cherry, blueberry buckwheat, peach with almonds, mango and coconut….. I mean, wow. What can’t you put in a pancake? Or maybe more so, what wouldn’t you put in??

Oatmeal is the same blank breakfast slate. A simple bowl can be doctored in dozens of ways, and yes, many of them in the same manner as listed above. They all work, so why wouldn’t oatmeal and pancakes work together? I’m here to tell you, with much enthusiasm and horn-trumpeting that they absolutely do. It’s a happy breakfast marriage.

These oatmeal pancakes, courtesy of Molly, were the epitome of hearty and satisfying, and so easily zipped into what breakfast should be all about, with maybe the tiny exception that you have to plan just slightly ahead with this recipe. While you probably could use quick oats and get away with it, I strongly recommend using the thick cut version to get the best affect that these stick-to-your-ribs cakes can offer, such as a breakfast that lasts for a good long time. Really, there isn’t much point to eating in the morning if your tummy doesn’t remember it even a few short hours later.

And there’s no better idea on a chilly Saturday morning than to pull a bowl of soaked oats from the fridge and quickly mix them into a substantial batter that sizzles from your griddle, filling the house with the aroma of ‘Come and get it!’.

If you’ve ever had Baked Oatmeal, where you mix your oats with eggs, brown sugar and spices and bake them into a thick pudding, then the flavor of these pancakes will be familiar to your mouth. The oats, so soft and tender from their overnight soak in buttermilk, bake into a firm pancake that happily soaks up your maple syrup. I’m really not up for much on any given Friday night, and I owe all the remaining energy from the week to dinner prep and a bit of couch time with Netflix on Demand and my two favorite guys, but I somehow managed to stop myself from climbing the stairs to my bedroom, at 9:15 no doubt- and whoa does that make me sound OLD-  and instead turning around to the kitchen to prep the oats for the next morning. I even washed and grated an apple into the mix, shredded in some lemon zest and then cleaned up my little mess. That’s motivation. It made the trip up the stairs to bed even better knowing that I was set for morning, because, you know there’s just something about Saturday morning that begs and whispers just the slightest bit for something special, something that clearly says “Oh yes. It’s the weekend.”

Oatmeal Pancakes

2 c. rolled or thick oats
2 c. buttermilk (or like I did, soy milk with lemon juice and zest mixed in- yum!)
3/4 c. AP flour (I subbed whole wheat)
2 T. sugar (I used turbinado, but brown I think would be best)
1 t. EACH baking powder and baking soda
1/2 t. sea salt
2 large eggs, slightly beaten
1/2 c. melted butter (equiv. to 1 stick. I only used 4 T., or half a stick and it was almost too much for my taste)

The night before, mix oats and buttermilk in a large bowl. Cover with plastic wrap and chill overnight. In the morning, remove from the refrigerator and stir gently.

Blend the flour, sugar, powder and soda and salt together in a large measuring cup. Add the eggs and melted butter to the oat mixture and stir well. Then gently fold in the dry ingredients. Do not overmix.

Heat your griddle or skillet and add about 1/4 cup of the batter. Allow to cook until browned on one side, then carefully flip and cook until golden brown on the second size. Serve topped with maple syrup or fresh fruit.

KATE’S NOTE’S– There isn’t much that I think can improve these pancakes, but I do feel that a bit of cinnamon and fresh grated nutmeg would really be stellar. As I mentioned, I grated an apple into the oats the night before. It could also be done in the morning too.

Read Full Post »

What’s that, you say? Ajvar? Is it AHJ-VAR? AGG-VAR? How do you say it?? And what the heck is it?!?

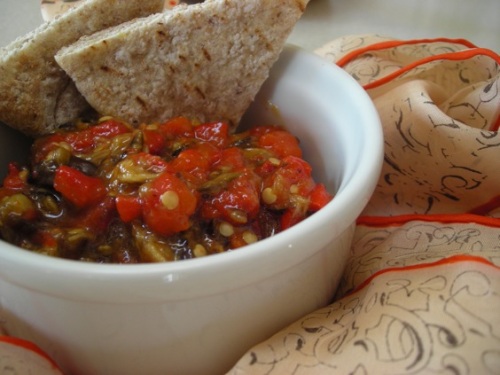
It’s delicious, delightful, piquant, sweet and when spread on a toasted pita, a tiny slice of food heaven. The origin is Balkan in nature, and it shares it’s etymology with caviar, although there is no fish roe involved.

And it’s pronounced EYE-VAR. As with most foods that pass through this little blog of mine, it has a story. A pricey one. And it goes like this.

I love ethnic foods, and the more eclectic and unique the ethnicity is, the better I like it. I’m happy to browse any manner of unusual food market I come across, my eyes trailing the shelves, fingering the ingredients found there and trying to determine if I know what is is, first and foremost, and if I can take it home and use it. I am so blessed to live in a very culturally diverse city, and within many channels and pockets of the population one can find amazing stores full of ingredients that will elevate simple home dining. In the middle eastern market that I frequent in Columbia Heights, where the pita bread is often so fresh that the bags are still warm, I came across a jar of a bright red condiment that caught my eye. Roasted red peppers, roasted eggplant, garlic, oil. Oh my, what’s not to love? Despite the hefty price tag, I took one home. Big mistake.


I toasted some of that wonderful pita bread and slipped it through the bowl of bright red Ajvar in front of me, lifting it to my mouth. I was lost. I fell hard and fast for this sweet, somewhat spicy and cool relish. Mixed with a bit of plain yogurt, I could eat it night or day. And I did. I made pilgrimages back to that market for more bread, for more Ajvar. The price always got me, but I forged on. I loved the stuff. But like all good things, bested as they can be by economic downturn, I had to suspend my tastebuds desire for it and stop driving back to that store to buy another jar.

But I didn’t forget. There would be a day to enjoy it again. I was certain of it.

Like for many, that economic downturn hasn’t really let up it’s grip on us, and being the case, I’ve yanked up the bootstraps and found ways to further stretch the dollars and yet not go without some of the foods I really love. But it took coming across a superbly simple recipe for Ajvar to prompt me into actually making this at home.

What could be simpler than roasting vegetables to a nice rich blackened state and running my big knife over them? Because, you know, when looking at this, I yet again get that feeling that I wish I hadn’t waited so long.

Ajvar
recipe source unknown (somewhere in Internet land)

1 large eggplant, sliced in half the long way
2 red bell peppers, split in half and de-seeded
2-4 garlic cloves (optional)

Preheat oven to 450° and adjust one rack to the lowest level in your oven. Cover a baking sheet with foil and spray the foil with cooking spray. Place the vegetables cut side down on the sheet and lightly mist the tops with cooking spray. This is optional, but I find it helps with the charring.

Roast the vegetables on the lowest rack until the tops of the peppers are black and wrinkly, and the eggplant has softened. Depending on your oven, this could take anywhere from 15-30 minutes, or maybe more. Check regularly to monitor. If your house is like mine, you may need to de-activate your smoke detector. This is a fragrant and hot process.

Remove the sheet when the veggies are ready and allow to cool completely. At this point, you can either place them in a food processor to blend, or simply mince them on a cutting board. I used the cutting board and my big chef’s knife. It took me about 2 minutes. Place minced veggies in a bowl, add about 1/4 cup of good quality olive oil, and then season to taste with salt and pepper. If you want it spicy, feel free to add crushed red pepper, or if you can find it,  ground szechuan peppercorns would be amazing in this. I prefer mine on the mild side. It can be served room temperature, but the flavor will develop after a day or two in the fridge.

Eat it with toasted pita, carrots, or spread on hearty crackers. It tastes wonderful when mixed with a little plain yogurt too. I also think it would be delicious served over pasta.

Read Full Post »

There are certain foods that are superstars of nutritional value, simple to prepare and easy on the pocketbook yet are really kind of ugly ducklings in terms of aesthetics. If we eat with our eyes first and foremost, and if we didn’t know that these foods were not only powerhouses in being good for us AND very tasty as well, we would take one look at them and likely turn away in scorn. Take lentils for example. These tiny legumes are so rich in the good things we need for our bodies. But I imagine there’s a huge population of people simply turned off by their unfortunate lot in the food world beauty contest. Cooked to perfection and placed in a bowl, they resemble more a pile of mud than something amazing you want to eat.

Now doesn’t that sound delicious?! Can’t wait to dig in!

I do get it. Really, I do. If it wasn’t for the copious amounts of fragrant dhals and mounds of aromatic Indian food that I’ve come to adore in my life, I might not exactly be in the Lentil Fan Club. But I am. And I think that everyone should. As legumes go, the lentil is one that you can take from dried form to beautifully cooked with hardly a second thought. Even the largest brown lentils will cook up nicely in about 20-30 minutes, the smaller pink and red ones turn delightfully smooth even faster, making the lentil a smart choice to keep on hand for a hearty meal. With added vegetables, it turns into a perfect soup. Served over rice, maybe with a salad and you’ve got a complete meal. Add in one of the heady fragrant spices of Indian cuisine, such as fenugreek or cumin -or in this case, both- and you’ve got a delicious creamy, slightly spicy and overall compelling meal with little more than boiling some water and a measuring spoon or two.

By far and away my favorite lentil is the French Puy, also known as the French Green lentil. It’s smaller than the brown, larger than the more colorful red and pink and will also cook up easily, all the while retaining it’s shape more without turning mushy. While the mushy lentil does have it’s place, I really prefer some texture to them. The Puy has a somewhat higher price tag than the brown, but I think it’s worth it. The flavor too, is deep and earthy, a bit more intense over the somewhat gritty taste I’ve come across in the brown.

My first exposure to lentils was as a wee lass in elementary school. Our schooling, up until I was in 5th grade, centered mostly around a loosely defined cooperative that rented space in an old Catholic school building. We had some pretty progressive education, I guess these days it ties in best with home schooling, and one year we did volunteer work at the Renaissance Festival in a soup booth, making both Beet Borscht and Lentil Soup. I did not like the lentil soup much, but I was a kid. Forgive me for thinking it was odd among my usual repertoire of fish sticks and Rice-a-Roni.

Then in college, I had a roommate for a time who was a vegetarian and loved to cook. On occasion I would tag along with her on her trips to The Wedge Co-Op, back in the long ago days when it was so tiny that barely two people could stand in any aisle. I often had no clue about the foods she would buy but I asked her endless questions and when she cooked she would share some of her meals with me. One meal was lentils, and although I didn’t fall down in love with them, I had a better idea of them than what my childhood memories had given me. Still, it took cementing my love of Indian food for me to begin actually making them at home. Once I did discover how good they could be, really there’s no stopping me now. If only I could convince The Teen to try them.

One of these days, maybe.

Dhal with Green Lentils
adapted slightly from The Curry Book by Nancy McDermott

1 c. french puy green lentils, rinsed and sorted
4-5 c. water
1 t. ground turmeric
1 t. fenugreek seeds, crushed
1/2 t. ground cayenne
2 t. cumin seeds
3 cloves finely minced garlic
2 T. finely minced fresh ginger
1 medium onion, finely minced
1 medium tomato, chopped

In a large saucepan, bring 4 cups of the water and lentils to a boil. Skim off any foam that may form. Reduce heat to medium-low and add the turmeric, fenugreek and cayenne. Allow to simmer, uncovered, until lentils are tender- approximately 25-35 minutes. You may need to add more water as the lentils cook to prevent them from sticking.

When lentils are tender, heat a small skillet over medium heat with oil of choice. Add the cumin seeds and cook until they become dark and fragrant, and begin to pop. Add in the onion, garlic and ginger and reduce the heat, sauteing gently and stirring occasionally until the vegetables are soft, about 5-7 minutes. Stir the mixture into the lentils and blend well. If the lentils are soupy, you can raise the heat and simmer the mixture to reduce the liquid. Keep an eye on it so it doesn’t burn and stir it to keep blended. When cooked to your desired consistency, stir in the tomato. It will thicken slightly as it stands. Season with salt if desired.

NOTE: It’s unlikely you can find fenugreek in anything other than seed form. To crush them, use a dedicated spice grinder if you have one, or place them in a sealed plastic bag and crush them with a rolling pin, a meat tenderizer or other hard implement. The seeds are pretty solid. Don’t be surprised if doing it by hand requires slight effort. It’s totally worth it for the flavor.

This dish definitely gets better with some time to sit in the fridge. It can be made with the smaller colored lentils but keep in mind that the cooking time will be much quicker, and it will have a different texture. One cup of red lentils will need less water, about 3-4 cups.

Read Full Post »

Last year wasn’t my favorite year. Come to think of it, 2008 tossed some bombs my way and it all seemed to carry over, spreading out over time and trying to suck all the life out of me at every turn. As 2010 approached, and I looked back on the 12 months behind me, it was a bit sad to see that I’d paid far too much attention to the valleys in my life, and forgot to take in the view from the peaks.

Life is all about valleys and peaks. We’re up, we’re down and when we’re not, there’s the climbing out of the abyss and of course, slipping as we fall back into it. Sometimes our peaks are long, straight paths that resonate with light and glory, and we feel great. For a long time. Life is good and we breathe easy. But we slip, once more. The valleys can be dark. It’s hard sometimes to keep remembering that it doesn’t last forever. I’ve struggled to keep my chin up, part of me wishing fervently that this time of trial would just end already because really, I’ve had quite enough, thank you. Then I always realize that I’m climbing once again.

One aspect of 2010 that I’ve really wanted to do more of was to keep focused on the good, even when it seemed like there was nothing but darkness all around me. Fortunately, we’re only 6 weeks in, and what few dark moments that presented themselves passed rather quickly. It’s exciting to see the Earth changing around me, to notice with delight that there is still light at 5:45pm, that the tilt of the sun has changed enough to make 15° in February feel way different than it did in January. Or December. We’ve been absolutely dumped on in terms of the snowfall, and it’s given us quite a gorgeous landscape to look out over, and some stellar cross-country skiing. But beyond the natural turn that is happening, and the shorter amount of time between us and the arrival of Spring, it seems like there’s a whirlwind of good happening around me too. I hope to be able to share much more of what it entails as it pans out, but right now it’s slowly starting to twirl, like a tentative pirouette, moments of time pressing together and gradually expanding that are quietly whispering “Soon. Be Patient.”

The famous poem ‘Desiderata’ by Max Ehrmann has a line that says “… and whether or not it is clear to you, no doubt the universe is unfolding as it should.” For a long time it just never felt clear to me, it felt more like I was standing still while the world twisted and moved on around me. That’s changing, as is my perspective and I’m grateful. I’ve had this sensation inside me for a while now that I’m standing at the edge of a cliff, and everything in me knows that I just have to leap despite the voice in my head that’s saying “No- step back! You’re really scaring me!” I’m in my Indiana Jones moment, on the edge of that precipice. And this is my leap of faith. There is a bridge there that will catch me, even though I can’t see it.

There is one aspect of this extended time of trial in my life, and that is being available to just stop and enjoy those tiny moments along the way that can be so easily overlooked. Sitting down for a cup of tea one day really opened my eyes as the square cup seemed to fill my hands so perfectly. Moments of clarity that come from spending days with my almost 2-year old niece Nina,losing track of myself for awhile as I see life through her eyes. A Fall hike on a misty day that seems to leave the world around me at a standstill, smothered in the thick, wet air.

And with food too. Simple, easy and nourishing; stopping myself long enough to savor my lunch or an afternoon snack, taking the time to taste, smell and appreciate what’s in front of me.

I’ve spoken out for these garlicky white beans before, urging you to try them and fall in love with their simplicity like I have, the endless ways they can be dressed up as a quick yet nutritious meal. One bright and sunny afternoon I set out to simply stir together this favorite of mine, and as I perused the pantry, fridge and countertop, I reached for a can of tuna, half an avocado and some washed spinach, which when paired this time with lime zest and juice instead of lemon, made yet another winning combination. Great taste, good for the body and with the first few bites, apparently very good for the soul.

White Bean and Tuna Salad
by Kate

1 15-oz can great northern beans, drained and well rinsed
1 3-oz can of tuna, drained
2 cloves garlic, thinly sliced or minced
1/2 a ripe avocado, diced
1 c. fresh spinach, washed and chopped
Lime zest and juice to taste

Fresh thyme (optional)

In a medium skillet, warm about 3 tablespoons of oil and add garlic, sauteing gently until lightly browned. Add in the beans and tuna and warm, stirring to combine. When hot and steaming, add about half the spinach and stir until wilted slightly. Repeat with remaining spinach. Grate in some of the lime zest and squeeze in about 2 tablespoons of the juice. Stir and taste. Season with salt and pepper, more lime zest and juice if desired. Remove from heat and scrape into a bowl. Add the avocado and gently mix it in. Sprinkle with thyme and serve warm with rye crackers if you wish, or toasted pita bread.

Read Full Post »

When making something like Pumpkin Pancakes, after a long day in which I awoke at 5:15am and couldn’t get back to sleep, and a rough but magical, much needed visit to the chiropractor that left me limp and relieved, trying to explain these pancakes to a teenager with a selective hearing problem might result in necessary culinary shorthand. Like saying ‘Pumpcakes’. It felt a little like baby talk, but it made The Teen smile and giggle just a little and when you’re the mother of a big boy on the verge of 16, making him giggle, regardless of how it’s extracted, is pretty heart-warming. Especially when he sort of coos “Aww. That’s kinda cute.” Shhh. You didn’t hear that from me, ok?

And also, on the tail end of a two-day snowfall that blanketed us with about 10 more inches that had to be put somewhere- like on top of and over the 4-foot plus piles around our slowly disappearing house- these Pumpcakes were awfully darn heart-warming all on their own.

Anyone want to take bets on whether this pile will still exist in July?

Pumpkin pancakes have never crossed our griddle, although I’ve seen them all over the ‘net; perfect dark rusty rounds of batter, thick and substantial. I always thought they looked pretty good. I love pumpkin bread, and muffins and scones and just about any baked good made better with the flesh of a gourd, but pancakes? It was time for me to explore. Plus, I was thoroughly out of inspiration for anything else and the little hand on the clock was rapidly approaching the 5:00 hour. I punted, did a quick Google and came up with this recipe.  Now, does it say something that this was the only recipe out of the first dozen or so that Google spit out to me that did NOT contain a base of Bisquick? Gah. I hope not. Scratch pancakes are pretty basic, requiring little else but flour, leavening, a bit of sugar and salt, liquid and egg. I had this recipe completed and sitting on the counter in about 5 minutes. It required only for me to climb on a chair to dig the container of baking soda out from where it had been pushed to the back of a top shelf.


The compote was total cowboy cooking. There was a leftover apple that I didn’t have room for after lunch and I quickly chopped it up, sauteing it in a small pat of butter before adding chopped pecans, a handful of currants and some leftover maple syrup blended with butter that we’d drizzled over roasted squash earlier in the week. It simmered while the pumpcakes cooked and in a few twists of a spatual, a hearty and aromatic dinner was on our plates. We could sit down with a sigh, the opalescent glow of fresh snow all around us and imbibe in these richly scented cakes with a sweet and crunchy topping and be warmed from both the food and the company. I do love days like that.


Now here’s my take on these Pumpcakes. They were good. No, scratch that; they were great. Really flavorful and hearty and thick. Lumberjack fare, if you know what I mean. Maybe it was the recipe but they took a rather long time to cook, and even when some of them were so robustly bronzed that I thought they’d be tough as shoe leather, they still seemed to me to be a little moist inside. Griffin even brought his to me and said “Are these done?” poking a fork suspiciously at the interior. I was expecting, like any pancake, that it would be fluffy, but given the added pumpkin, it would stand to reason that they’d be more dense. They tasted fine. Just plan on allowing them extra time on the griddle. The batter that resulted from this recipe was very thick. That should have been a clue to me. After a long day and with the added relief from my aches and pains, I can’t always sufficiently tie two strands of obvious together. On a side note, for some added nutrition I used WW flour in place of AP in the recipe, added 2 tablespoons of ground flaxseed and a 1/2 cup of cornmeal, and subbed unsweetened applesauce for the oil.

And that compote? Now that was a winner. I wish I had made more to have on hand for oatmeal, or to spread on toasted bread. It was stellar, a perfect winter treat and way open to personal experimentation.

Apple, Pecan and Currant Compote
by Kate

1 medium tart apple, washed, cored and diced fine (I used one called ‘Jazz’- it was tart, but subtly sweet too)
1 c. chopped pecans
1/3 c. currants
1 T. butter
1/2 c. pure maple syrup

In a skillet over medium heat, melt the butter and add the apple. Saute for a few minutes until the apple is soft, then stir in the pecans and cook, stirring regularly, until the nuts are slightly toasted and fragrant. Pour in the maple syrup and reduce the heat to low. Cook, stirring occasionally until the maple syrup has been absorbed. Stir in the currants and heat through. Serve warm over pancakes or waffles. Will keep refrigerated for several days. If you can resist. Reheat in the microwave if desired. This tastes amazing if sprinkled with a light dusting of sea salt prior to serving. Something about that salty sweet crunch…..

I love the idea of pears, almonds and figs for another version of this.

Read Full Post »

Mmm hmm….that’s right. Chocolate. Toll house. Bars. An unlikely sisterhood of fudgey brownie and the famous toll house recipe baked into a pan. I’m really a cookie lover at heart, but sometimes I just don’t want to scoop and bake repeatedly. Sometimes I just need to cream, stir, blend and fold myself into contentment, the end result being more easily achieved than what requires parchment, trays and repetitive movement. Take one recipe for your favorite version of a Toll House bar and stir some good cocoa powder into the dry goods. Take a bite and sigh with contentment. See? I would never steer you wrong.

I can bake. I love to bake. My lifeline to my guardian angel, my mother, lies in my mixer and flour container. With a spatula. I have no fonder memories of her than baking with her, the sunlight streaming in her kitchen window. I should recall her laugh, which was loud and shrieky, I mean, have you heard mine? She caused that, no doubt. My brother too. When he and I laugh together, people cover their ears. They wince. We get asked to be quiet in movie theaters, and we shock people. But her laugh, while amazing and warm was just a blue ribbon pinned on the strong and capable woman that she was, and that I strive to be. I may bend in the breezes, or twist against the savages of life, but no matter what happens, I am still the person she raised me to be, no more or less. With a spatula in hand. And cookies. They were her favorite. She made pies, bundt cakes (ooh, lime green ones sometimes. Eeek.) and she made bars too. But cookies were her specialty. Now I could do without the nuts that she loved, and to this day I haven’t been able to abide by the walnut, so overpowering was that in my youth and usually rancid if I am able to judge now. She put it in everything, and I picked them out of everything. If I was woe to forget to throw them away, the pile left behind would elicit one of her pretend indignant shrieks of “KATE!!!” because she just knew me that well. It was always me who carefully and diligently despised her walnuts. Or maybe my siblings were just better at remembering to dispose of the evidence.

One thing that Griffin does love to do is make cookies now and again. I like to keep everything on hand in case he gets a hankering for a homemade treat. The other day he was all set to make some Toll House bars when he discovered we didn’t have enough butter. With the saddest sigh that he could muster, he replaced all the ingredients he’d taken out and silently went upstairs. Mommy guilt overcame me. Although we had a few options available in the form of frozen commercial cookie dough, there is one thing that my teenager has inherited from me that sticks like glue: when he gets his mind on something he wants, he can’t settle for anything less. So the next day I went to the store and bought a lot of butter. Then when he was gone one night, I made a pan of bars and on a whim, added cocoa to the flour mixture.

My mom is probably smiling right about now.

Are there any alchemist secrets to baking? I’m really not one to ask, as for me baking is like looking at my right hand. It’s so much a part of me that I don’t recognize what might make it special. Or difficult. But plenty of people struggle with it. Baked goods fall flat, are dense and hard, they don’t rise enough or they balloon out of control. The fall when they come out of the oven. You know what? Mine do too. Even after a lifetime of experience, I can still often see fault in my bars. This pan, for instance, was so beautiful and fluffy when I pulled it out of the oven, and 20 minutes later, the center had collapsed like a mutual fund. It happens to me all the time but it never stops me from trying. They taste the same. And really, when I die, no one is going to be standing at my casket shaking their heads morosely and saying “Her bars always collapsed. It was so sad.”

The cocoa gives these familiar and comforting bars an added depth. While Toll House bars are nice and all, they really lack the pizazz of their more colorful and opulent baked counterparts. They’re reliable and sound but they’ve been left behind for everything sweet and dotted with sea salt, doused in browned butter, lavender essence and gold leaf. Oh Toll House, those new millenium treats smirk,  you are so 1975. Place them on a table with something exotic, and the poor plate will get skimmed over. Turn it into a delicate brownie-like, cakey and soft square, and it will stand apart. If nothing else, it will just make your mouth pretty happy. In a less expensive way. And we like that, don’t we?

Chocolate Toll House Bars
by Kate, adapted from the original recipe. My version is a little different so read it through. Some new tips are included.

2-1/4 c. AP flour (i used half whole wheat flour)
1 t. baking soda
1/2  t. sea salt (this is a personal preference; I don’t like the taste of iodized salt in my baked goods. use what is right for you)
1/4 c. cocoa powder
1 c. softened butter – NO substitutions (or at least don’t tell me about it)
1/2 c. EACH white sugar and brown sugar (firmly pack the brown)
2 eggs
1 t. pure vanilla extract
1/8 c. (or about 3 T. ) whole milk or cream (i used vanilla soymilk)
1  12-oz package Chocolate chips of choice (i use Ghiradelli semi sweets)

Preheat the oven to 350°. Spray a 9×13 pan with cooking spray. In a large measuring cup, whisk together all the dry ingredients.

In a large bowl, or a stand mixer, blend the soft butter and both sugars until fluffy and light. Be sure to really beat these well. The more air you incorporate into this, the fluffier your finished product. Beat it, scraping the bowl occasionally, for at least 5 minutes. Longer if you can.

Add the eggs, vanilla and milk. Blend well. Now remove the beaters and scrape them into the bowl.

Add all the flour at once, and with a stiff rubber spatula, begin gently folding it into the butter mixture. Remember to scrape across the bottom of the bowl and gently turn it over. Don’t stir it or you’ll deflate all that air you beat into the butter. Watch what you’re doing and when you’ve incorporated about half the flour, stop folding and add in the chocolate chips at this point. Continue to fold the remaining flour into the mixture, along with the chocolate chips. There will be a single magical moment when it all comes together in a beautiful glossy homogenized mass, and at this point, make sure there is no flour at the bottom of the bowl and then stop folding. Scrape it into the prepared pan and gently spread it to the edges. It’s fine if it doesn’t look perfect. Bake it for about 25 minutes, checking with a toothpick to determine if it’s done. Remove pan and allow to cool before cutting.

KATE’S NOTES:
I know that all recipes for these bars tell you to incorporate all the flour and then fold in the chips. Somehow this has worked for decades, but once you incorporate the flour, the more you stir and mix it, the tougher it will get and the bars will come out denser than you might expect. If you add the chips partway through the flour step, the finished product is lighter and you get more distribution of the chips. If you’re like me, you prefer your chip ratio to be even, not clumped up in some spots more than others. Even with the beating and gentle folding, these bars collapsed but they aren’t dense, just moist and fudgey.

This recipe calls for less sugar than any recipe you’ll find in print. With the addition of the milk, and of course those chocolate chips, there really isn’t the need for that much sugar. I’ve realized as I get older and experiment with baking that many, many recipes are too sweet, and cutting back sugar is always a good thing, isn’t it?

And yes, most recipes don’t call for milk to be added but if you follow this one, the additional cocoa needs to be balanced by a little more moisture, and the milk adds a nice touch, making them sweeter with a bit of richness. Experiment with what you have on hand. Flavored coffee creamers might be lovely to add a hint of something extra. And if they fall while they cool, no one will notice because they taste simply amazing. Especially for breakfast with some really dark coffee.

Read Full Post »

Winter weekends sure can be a mixed blessing. You’ve got an entire day spread out in front of  you with endless possibilities; time on your hands and hours to make just the way you want, and yet, if you’re like those of us in Minnesota, you often wake on those long days to crackling cold air and sunshine thats full of promise but delivers nothing in warmth.

Those are the days that just require waffles.

There’s something about a crisp and aromatic waffle that deems it a culinary perfection for a chilly winter morning. A morning that you know needs to lead to a productive day. A morning where the coffee pot seems to be endlessly working, where your pajamas are often more desirable than a pair of blue jeans, mornings such as one that finds you casually sipping your brew, and noticing that the bright sunshine has highlighted your neglect of the vacuum cleaner, the dustmop and a Swiffer cloth or two.

I’m sure others can relate, right?

I grew up with Sunday morning waffles. It was eagerly anticipated to come down the stairs to the pungent scent of the percolator on the stove as it bubbled away, competing with the creaky old waffle iron, hissing emphatically, cranking out perfect rectangles of golden hued delectable treats. I do love pancakes, especially ones that stray off the beaten track of breakfast food; pancakes with shredded apples and yogurt in them, bananas and pecans in a whole wheat pancake, chocolate chip flecked ovals cooked to soft perfection and then topped with summer cherry sauce. Pancakes even spread with peanut butter and eaten out of hand. Oh, do we know about pancakes in this house, yes we do. But waffles, why there is really no other means needed to enjoy them other than good butter and syrup, because the waffle, in all it’s dented glory is the perfect palate to top with a few slices of cold butter and then drizzle warm maple syrup over to run through tunnels, cubes and edges to dress them in sweet buttery delight. Those edges crunch, the syrup absorbs and the bites come together in the mouth, a marriage to linger over, knife and fork in hand, coffee to the side. I’ll eat pancakes for dinner, and often we do, but waffles are strictly breakfast, and best on the weekends when their sturdy personality buoys you up for the long day ahead.

And who wouldn’t love the crunchy and wholesome addition of some cornmeal to the waffle?

I’ve made cornmeal studded pancakes before, and really, they’re pretty good and all, but there’s something about the added crunch of cornmeal on batter placed in the waffle iron that just sort of gets me right there. I don’t know how to describe it any more than that. And when I came across the recipe for these crunchy beauties on Kristin’s lovely blog, somehow I knew I would adore them like a treasured memory so I put together a double batch. People, I made waffles for hours, it seems. Hours. Did I care? Oh no, not at all. You see, after I made the first one and dressed it appropriately, I consumed it with gusto. My tummy, loving the introduction of it, politely asked for another. And I complied. The batter seemed endless, but I stockpiled waffles for the next few days and two packs to go into the freezer. We are happily away in waffle ecstasy. Don’t bother to look for us, ok? We’ll be fine, really and I will come back when they’re gone and do it all over again.

Oh yeah, and after I ate that delicious breakfast, it spurred me on to clean my house from top to bottom and boy, did it look nice in the dazzling but cold winter sunshine then. All thanks to a perfect little cornmeal waffle.

Buttermilk Cornmeal Waffles
(from Kristin at The Kitchen Sink Recipes, slightly adapted from Gourmet magazine)

1 cup sifted all-purpose flour (sift before measuring)
1 cup yellow cornmeal, preferably stoneground
2 teaspoons baking powder
1 teaspoon baking soda
1/4 teaspoon salt
3 large eggs
2 cups well-shaken buttermilk
6 tablespoons vegetable oil plus additional oil for brushing waffle iron

Into a large bowl sift together flour, cornmeal, baking powder, baking soda, and salt. Repeat sifting 2 more times.

In another large bowl whisk together eggs, buttermilk, and oil. Add flour mixture all at once and whisk just until combined.

Preheat a waffle iron and preheat oven to 200 °F.

Brush waffle iron lightly with additional oil. Spoon batter into waffle iron, using 1/4 cup batter for each 4-inch-square standard waffle and spreading batter evenly, and cook according to manufacturer’s instructions. Transfer waffle to a baking sheet and keep warm, uncovered, in middle of oven. Make more waffles with remaining batter in same manner, brushing waffle iron with more oil before adding each batch.

Serve waffles with syrup.

Read Full Post »

Older Posts »